从一次挂载说起# 如果你写过React代码,那么ReactDOM.render(<App />, container) 可能是你最熟悉的一段代码了。<App />是一个React Element,container是一个node节点。这个方法是把React element映射到真正的DOM结构的一个触发器,当你调用这个方法之后,会把React Element渲染成virtual DOM Tree。
首先有必要提一下Element和virtual DOM Tree这两个概念。
React Element可能会存在type为Component Element的节点。而Virtual DOM Tree指代完全映射为真实DOM结构的树,所有节点的type都是string类型。
 1
 2
 3
 4
 5
 6
 7
 8
 9
10
11
12
13
14
15
16
17
18
19
20
21
22
23
24
25
26
27
28
29
{
// React Element Tree
type : App ,
props : {
children : [{
type : 'div' ,
...
}, {
type : Button ,
...
}]
}
}
// 最终渲染成的virtual DOM Tree
{
// Virtual DOM Tree
type : 'div' ,
props : {
children : [{
type : 'div' ,
...
}, {
type : 'button' ,
...
}]
}
}
}
渲染是怎么发生的?# React在接受<App />这个Element的时候,其实是不知道这个Element的深度是多少,每个节点对应的DOM元素是什么的,<App />这个Element下,可能只是一个简单的<div />,也可能是许多复杂组件的组合。因此,React需要自顶向下进行递归的渲染,最终得到一个对应到真实DOM结构的Virtual DOM树。
1
2
3
4
5
// 伪代码 并不会工作
function mount ( element ) {
let renderedElement = element . render ();
return mount ( renderedElement )
}
在上文中,我们谈到过React中React中有两种常见的component,一种是class,一种是function。二者在React Element中有着不同的表现。不同之处在于,class在type上对应的是这个构造的构造函数,而function对应的是组件的渲染函数。
考虑这两种不同的component,渲染逻辑会有以下改变。
 1
 2
 3
 4
 5
 6
 7
 8
 9
10
11
12
13
14
15
16
function mount ( element ) {
let type = element . type ;
let props = element . props ;
let renderedElement ;
if ( isClass ( element )) {
let publicInstance = new type ( props );
// componentWillMount 生命周期函数
if ( publicInstance . componentWillMount ) {
publicInstance . componentWillMount ()
}
renderedElement = publicInstance . render ( props )
} else {
renderedElement = type ( props );
}
return mount ( renderedElement );
}
mount这个递归函数大致的描述了React整个的渲染流程。但是作为一个递归,上面这个函数缺少了一个完备的递归最重要的一个印子,即结束条件。而在React中,递归的结束条件就是将React Element Tree 渲染成对应的Native View tree。
渲染Host Component# 前一篇文章中也提到过,Host Component对应的就是不同Platform的基本元素。比如ReactDOM对应的就是DOM Element,ReactNative对应的就是对应的native view。React Element Tree Parse最终会把所有的element parse成对应的Host Component tree。
以下以ReactDOM为例。
我们想要挂载一个Host Component时,实际上是生成了一个对应平台的基本元素。
 1
 2
 3
 4
 5
 6
 7
 8
 9
10
11
// basic example
function mountHost ( element ) {
let type = element . type ;
let props = element . props ;
// type 是一个string
let node =
document . createElement ( type );
Object . keys ( props ). forEach ( propName => node . setAttribute ( propName , props [ propName ])
)
return node ;
}
上面是一个最简单的例子,在上面的例子中,你的Host Component不会有任何的children。加上children之后,实现会发生一些改变。
 1
 2
 3
 4
 5
 6
 7
 8
 9
10
11
12
13
14
15
16
17
18
19
20
21
22
23
24
// basic example
function mountHost ( element ) {
let type = element . type ;
let props = element . props ;
// type 是一个string
let children = props . children || [];
let node =
document . createElement ( type );
Object . keys ( props ). forEach ( propName => {
// children 不是 attribute
if ( propName !== 'children' ) {
node . setAttribute ( propName , props [ propName ])
}
})
// render children
children . forEach ( childElement => {
let childNode = mountHost ( childElement );
node . appendChild ( childNode );
})
return node ;
}
上面这种写法能正确渲染这种元素
1
2
3
4
5
< div >
< header />
< main />
< footer />
</ div >
但是如果children中有非Host Component,上面这种写法就无法工作了。
1
2
3
4
5
< div >
< Sidebar />
< Container />
< Footer />
</ div >
渲染Composite Component# 为了完成Children中的Composite Component渲染,我们需要了解一下Composite Component的渲染。
Composite Component其实就是我们之前提到过的Component Element(以下统称Composite Component)。对于这种Element的渲染,其实可以参考我们最初创建的mount函数。二者唯一的区别就是,我们会递归调用经过组合后的mount函数。
 1
 2
 3
 4
 5
 6
 7
 8
 9
10
11
12
13
14
15
16
17
18
19
20
21
22
23
24
25
26
27
function mountComposite ( element ) {
let type = element . type ;
let props = element . props ;
let renderedElement ;
if ( isClass ( element )) {
let publicInstance = new type ( props );
// componentWillMount 生命周期函数
if ( publicInstance . componentWillMount ) {
publicInstance . componentWillMount ()
}
renderedElement = publicInstance . render ( props )
}
else {
renderedElement = type ( props );
}
// 组合版mount函数
return mount ( renderedElement );
}
// 组合mountHost和mountComposite
function mount ( element ) {
if ( typeof element . type === 'string' ) {
mountHost ( element )
} else if ( element . type === 'function' ) {
mountComposite ( element )
}
}
有了这个mount函数之后,我们便能很好的处理我们上面的children的挂载了。
 1
 2
 3
 4
 5
 6
 7
 8
 9
10
11
12
13
14
15
16
17
18
19
20
21
22
function mountHost ( element ) {
let type = element . type ;
let props = element . props ;
// type 是一个string
let children = props . children || [];
let node =
document . createElement ( type );
Object . keys ( props ). forEach ( propName => {
// children 不是 attribute
if ( propName !== 'children' ) {
node . setAttribute ( propName , props [ propName ])
}
})
// render children
children . forEach ( childElement => {
let childNode = mount ( childElement );
node . appendChild ( childNode );
})
return node ;
}
至此,我们的Element Tree已经完全渲染成对应的DOM tree了。真正的挂载到DOM上就是简单的调用JavaScript。
1
2
3
4
5
6
7
8
function mountTree ( element , container ){
let node = mount ( element );
let rootNode = container . firstChild ;
container . rootElement . appendChild ( node );
}
var container = document . querySelector ( '#container' );
mountTree (< App />, container );
以上其实就是ReactDOM.render函数调用后发生的所有事情的简化版(现实中的React要比这复杂得多)。
如何高效更新# 有了这个mount函数,我们已经有了一种机制去很好的更新我们的DOM了。最暴力的方法就是每次元素有更新的时候我们去重复一下上面的操作,刷新我们的组件。但是这无疑是一种低效的行为,我们更想要的是尽可能的reuse已经存在的DOM,更新只需要更新的节点。
那么,当某个节点的props发生更新时,我们怎么才能知道是这个节点需要更新呢?看上去我们需要保存一些必要的信息,来帮助我们维护React Element Tree和真实DOM之间的映射关系。
而class就是一种很好的能维持这些数据的抽象。
Host Component(以DOM为例) 和 Composite Component# 藉由上面的mountHost和mountComposite两个函数,我们可以简单的抽象出Host Component 和Composite Component 这两个class。
 1
 2
 3
 4
 5
 6
 7
 8
 9
10
11
12
13
14
15
16
17
18
19
20
21
22
23
24
25
26
27
28
29
30
31
32
33
34
35
36
37
38
39
40
41
42
43
44
45
46
47
48
49
50
51
52
53
54
55
56
57
58
59
60
61
62
63
64
65
66
67
68
69
70
71
72
73
74
75
76
77
//我们将这两个component的实例化交由一个工厂去完成
function instantiateComponent ( element ) {
const type = element . type ;
if ( typeof type === 'function' ) {
return new CompositeComponent ( element );
} else if ( typeof type === 'string' ) {
return new HostComponent ( element );
}
}
class CompositeComponent {
constructor ( element ) {
// 保存必要的信息以供后面使用
this . currentElement = element ;
this . renderedComponent = null ;
this . publicInstance = null ;
}
getPublicInstance () {
return this . publicInstance ;
}
mount () {
const type = this . currentElement . type ;
const props = this . currentElement . props ;
let renderedElement ;
let publicInstance ;
if ( isClass ( type )) {
publicInstance = new type ( props );
// componentWillMount 生命周期函数
if ( publicInstance . componentWillMount ) {
publicInstance . componentWillMount ()
}
renderedElement = publicInstance . render ( props )
} else if ( typeof type === 'function' ){
publicInstance = null ;
renderedElement = type ( props );
}
this . publicInstance = publicInstance ;
this . renderedComponent = instantiateComponent ( renderedElement );
return this . renderedComponent . mount ();
}
}
//HostComponent
class HostComponent {
constructor ( element ) {
// 保存必要的信息以供后面使用
this . currentElement = element ;
this . renderedChildren = [];
this . node = null ;
}
getPublicInstance () {
return this . node ;
}
mount () {
let type = this . currentElement . type ;
let props = this . currentElement . props ;
let children = props . children || [];
let node = document . createElement ( type );
this . node = node ;
Object . keys ( props ). forEach ( propName => {
// children 不是 attribute
if ( propName !== 'children' ) {
node . setAttribute ( propName , props [ propName ])
}
})
// render children
this . renderedChildren = children . map ( instantiateComponent );
const childrenNodes = this . renderedChildren . map ( childComponent => childComponent . mount ());
childrenNodes . forEach ( childNode => node . appendChild ( childNode ));
return node ;
}
}
在这里,我们抽象了HostComponent和Composite Component这两个对象,而这两个对象就是React术语中提及到的Internal Instance。
Internal Instance的意思是,
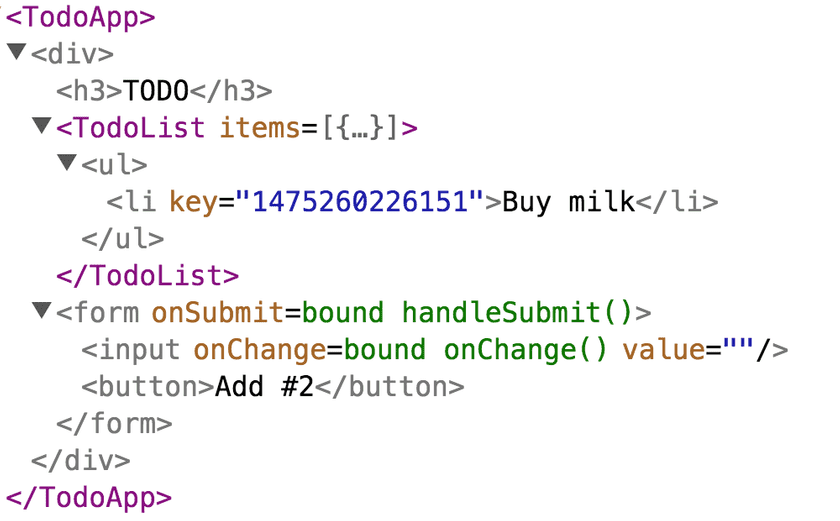
这两种抽象由React内部维护,使用React框架的人并不需要关心。 Internal Instance也不像我们之前谈到过的组件(比如一个Button组件),无法由使用者自行创造。 Internal Instance其中包含的信息也仅供React内部消费。 如果你想了解更加直观的看到Internal Instance,可以使用React Dev Tools
紫色部分就是CompositeComponent,灰色部分就是HostComponent
使用Internal Instance – 卸载(unmount)组件# 上面我们谈到了在Internal Instance中维护了三个数据,分别是
在CompositeComponent中,
currentElement 当前CompositeComponent所对应的React ElementpublicInstance 当前CompositeComponent绑定的React Element实例renderedComponent 当前CompositeComponent所对应的渲染过的Internal instance在HostComponent中,
currentElement 同上node 和当前HostComponent绑定的DOM noderenderedChildren 当前HostComponent所对应渲染过的Internal Instance组那么,这些保存的信息到底有什么作用呢?让我们来看一个卸载的例子。
Internal Instance unmount# 对于CompositeComponent,在unmount时我们还需要进行生命周期函数的调用。
 1
 2
 3
 4
 5
 6
 7
 8
 9
10
11
12
class CompositeComponent {
// ...
unmount () {
if ( this . publicInstance ) {
if ( this . publicInstance . componentWillUnMount ) {
this . publicInstance . componentWillUnMount ()
}
}
this . renderedComponent . unmount ()
}
}
对于HostElement,在unmount时做的事就要简单许多
1
2
3
4
5
6
7
class HostComponent {
// ...
unmount () {
this . renderedChildren . forEach ( renderedChild => rederedChild . unmount ())
}
}
unmount tree# 对于已经挂载到DOM节点上的React Element,卸载的操作其实就是递归调用所有componentWillUnMount生命周期函数,然后让节点的innerHTML置空。
1
2
3
4
5
6
7
function unmountTree ( containerNode ) {
const rootNode = containerNode . firstChild ;
// 不会工作,因为我们还没有在container node上存储过这个值
const internalInstance = rootNode . internalInstance ;
internalInstance . unmount ();
rootNode . innerHTML = '' ;
}
更新mountTree函数# 在上面的代码中我们发现我们在mountTree的时候需要存储rootNode的internalInstance,以供卸载时使用。
 1
 2
 3
 4
 5
 6
 7
 8
 9
10
11
function mountTree ( element , containerNode ) {
const rootComponent = instantiateComponent ( element );
const node = rootComponent . mount ();
containerNode . appendChild ( node );
containerNode . internalInstance = rootComponent ;
// 模拟ReactDOM.render() 一样的返回
const publicInstance = rootComponent . getPublicInstance ();
return publicInstance ;
}
What’s Next# 上面组件树卸载的例子对于Internal Instance的使用只是非常基本的使用,对于Internal Instance中维护的数据,更巧妙的使用是在组件树发生更新时,只更新对应的组件。关于这些细节,我会在下一篇博客和大家分享。
参考资料# https://reactjs.org/docs/implementation-notes.html